How to Use Docker (Part 1)
How to Use Docker (Part 1)
Introduction
Docker allows applications to be isolated into containers with instructions, and it can be easily ported between different machines. Docker is often compared with Virtual Machines, the major difference is illustrated as mentioned in here:
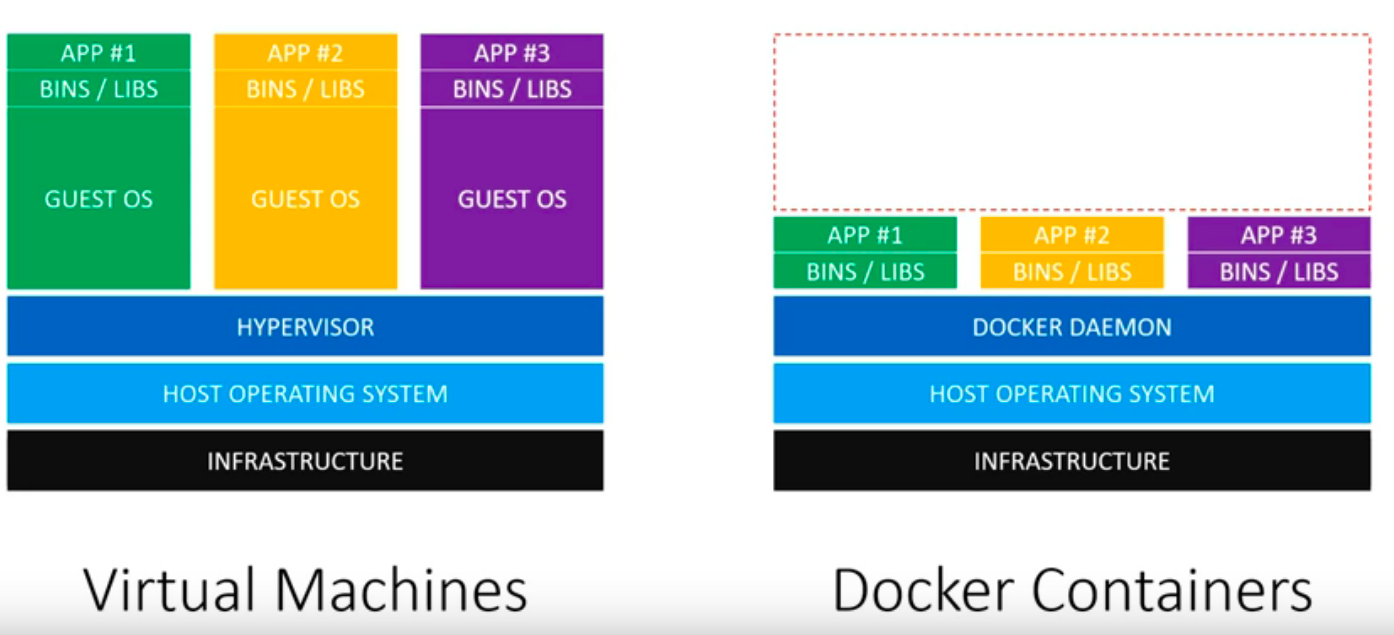
Using docker saves more resources and provides more isolation, here is another explanation video here.
Installation
Docker can be installed on different OS, here I will be installing docker on CentOS:
- install required packages:
sudo yum install -y yum-utils lvm2 device-mapper-persistent-data- set up the stable repository(community edition):
sudo yum-config-manager --add-repo https://download.docker.com/linux/centos/docker-ce.repo- install docker with
sudo yum install docker-ce - now you should be able to start docker with:
sudo systemctl enable docker
sudo systemctl start docker- note that I’ve been using
sudoto execute command, if you need to add users that are not root, you will have to add the user to the docker group like:sudo usermod -a -G docker test_user. (and you might need to exit and login as the user again)
Docker Hub
Docker hub is similar to Github but for docker images, you can explore all the containers either verified like ubuntu or user created docker image. Create an account in docker hub since we will be using that credential to push and manage docker image.
Docker Images and Dockerfile
What is docker image?
An image is an executable package that includes everything needed to run an application–the code, a runtime, libraries, environment variables, and configuration files.
A container is launched by running an image, that means a container is a runtime instance of an image.
Now let’s check docker images we have with either docker image ls or docker images. There are no images yet, so let’s pull some example images to our machine with docker pull hello-world. When you pull an image like this without specifying a tag, it will by default using the latest tag version of the image. let’s also install an ubuntu images with xenial tag as well for later examples: docker pull ubuntu:xenial

After listing the images, we can also see the image id, which might be used later if you want to reference the image, such as deleting the image with docker rmi [image id]. (rmi rm image).
As mentioned earlier, container is runtime instance of an image, let’s run the example image: docker run hello-world you should see some message in the output, we will see more examples with containers later.
Now let’s build a customized image. There are two ways to achieve this, one way is to create a Dockerfile to build an image, the other way is to make some changes on a base image and then commit/save that change as another image.
To use the dockerfile approach, create a new directory and create a file named Dockerfile , note that the convention is to use this name, you could use other file name but then you will have to let docker know about the file to use. You can do a lot of things here, but for demonstration purpose, we will create a simple image based on Ubuntu and install some packages, in the Dockerfile:
FROM ubuntu:xenial # base image
LABEL maintainer="hello@example.org" # add some metadata info
RUN apt-get update # run commands
RUN apt-get install -y python3 # the -y means select yes when promoted during the
# installation,don't forget about this otherwise the build won't success because
# docker sees there is a promot it will abort the process
Save the file and run docker build . will build an image(you can add more info with these args).
To use the commit change approach, we will go into the container the make changes that is described below. (you can check the history of the image with docker history IMAGE
Image and Container Management
Remember we tried to run the hello world example with docker run hello-world? Let’s check the status of running containers with docker ps, oddly there is no containers running, but you can check containers that was running with docker ps -a

You will see something like this ( I ran ubuntu earlier that why it is listed here as well), you can reference containers with either container Id or the random names generated by docker.
You can start or stop container using docker restart [docker id] or docker stop [docker id]. Say I want to go into the ubuntu container and install some packages, I could do:
docker container run -it ubunt:xenial
-it is short for -i -t, -i means run the container interactively, -t is short for -tty,means allocating a pseudo-TTY, now you should be in the container as root user, you can install packages, say apt-get update and apt-get install telnet, and we want to save these changes as a new image so that we can use later without installing telnet again.
Check docker container status, and get the container id you installed vim, then use docker commit [container id] test/testimage:v1 to save the changes based on ubuntu:xenial as a new image, now if you do docker images you should see a new image with the name test/testimage, if you run a new container use the test/testimage:v1, you should see telnet is already installed(which telnet will return /usr/bin/telnet). .
If you want to make this new image available to other people, you can push it to docker hub,but first you will have to login docker login with your docker hub credential:
docker tag my_image $DOCKER_ID_USER/my_image
docker push $DOCKER_ID_USER/my_image
Note that earlier when we tried to run container we were automatically in the new container, but if you want to start running a container in the background, you can add -d (detach mode)into the arg, and later if you need to go into the container, you can use docker attach
Although there is another to do something in a container without attaching it using docker exec [container name or id] /bin/cat /etc/profile (but this container has to be already running in the background). And you can combine docker logs CONTAINER to see the logs of a container.
Expose Container with Port Redirects
In order to let containers to listen to a port, the port has to be exposed to the underlying host, let’s take nginx as an example (for http request, the default port is 80, the nginx container exposes port 80):
docker pull nginx
docker run -d nginx

# let's find out the container ip address
docker inspect [container id]

# we will use elinks to help us validating the request on the server
sudo yum install elinks

# you should see the nginx welcome page
elinks http://[container ip address]

# this won't work now
elinks http://localhost
# services running in the container are bouding to the container IP address

# But I can start the container with port 80 exposed
docker run -d -p 8080:80 nginx
         [local port 8080]: [container port 80]

# you will see the port gets exposed if you do docker ps again
# now if you try to access http://localhost:8080, it will show nginx welcome page